Going “Knee Deep”
The information provided below is intended as an educational resource intended for surgeons and trainees (medical students, postgraduate residents and fellows starting practice). The information included are my templates for patient expectations, handouts useful for counseling patients in the clinic, forms for completing letters and office paperwork, surgical operative note templates, and similar items. These are free to use for reference, but they should be edited as needed to suit your practice settings and should always be applied with clinical judgement to the treatment of individual patients. They are intended as guidelines and resources and do not constitute medical advice. Unintentional errors, intentional misuse, or unintentional misinterpretation or failure to update this information is the responsibility of the learner/user. Please reach out to me with specific questions.
I myself am always learning and am far from perfect. As seen above in the photograph taken 10 years into clinical practice, I am always seeking to learn and better understand my own techniques and principles. Any adopted modified or evolving techniques will be updated here occasionally, but should not be taken at face value as the exact technique which I am currently using or use in any particular case as I modify each note and resource to suit specific circumstances, the same as I would in clinical care. Please use your judgement but I hope the following information is helpful.
Operative Note Templates
- ACL Auto Template
- ACL Quad Auto Template
- Ex Fix Knee Template
- ACL Repair Template
- ACL Allo Template
- Hardware Removal Template
- Knee MPFL and TTO Template
- OATS allograft Knee Scope Template
- Knee Scope Template
- OATS Knee Scope Template
- ORIF Tibial Plateau Fx Template
- Op Note - Generic
- PCL Allo Template
- Quad Tendon Repair Template
- Tibial Plateau ORIF Template
Surgery Case Preference Cards
- ACL Hamstring Autograft
- Arthroscopy-Distal Femoral Osteotomy with OATS
- ACL Recon ALLOGRAFT
- Arthroscopy-Biocartilage
- ACL Repair vs Recon ALLOGRAFT
- Arthroscopy-Oats
- Meniscus Repair
- MPFL Recon with Allograft
- Meniscus Root Repair
- Arthroscopy
- PCL All Inside- Allograft
- PLC Posterolateral Corner Reconstruction PLC
- PCL
- ACL Recon QUAD AUTOGRAFT
- ACL Repair vs Recon QUAD AUTOGRAFT
- Knee-MCL,LCL Repair
Knee Deep Blog
Bone Grafting in Two-Stage ACL Revision
Two-stage ACL revision is sometimes unavoidable when prior tunnels are malpositioned, widened, or biologically compromised. I had a recent question:
How do you like to graft ACL tunnels?
In my practice, most revision tunnels aren’t neat cylinders—they’re irregular caverns. This is probably because I tend to see more soft-tissue grafts for revisions rather than BTB. And to be very honest, because I have to revise my own, too, and those tend to be all soft tissue. Because of this geometry, I’ve gravitated away from dowels and toward a chips + putty construct that can conform to the true shape of the defect.
Tunnel Preparation
I use a FlipCutter 3 on the femoral side, progressively enlarging and scraping the tunnel walls until I’m down to clean, bleeding bone. The process naturally creates a conical cavity rather than a uniform cylinder, which reinforces the need for a moldable graft. I tell our fellows you can run the flipcutter and use it like a “toothbrush” along the walls of the tunnel.
On the tibial side, I’ll typically ream to a 10 mm diameter at the joint line. Then this creates enough space for a camera and a currette up the tunnel from inferior. I’m careful to preserve the tibial aperture to avoid blowout into the anterior horns or tibial plateau. Visualization up the tunnel with the camera allows thorough debridement until only bone remains but I don’t typically have the trajectory exact and so again the currette will make an irregular shape but is selective about taking a minimum of bone and all of the old graft.
Graft Composition & Technique
My standard construct is:
- Cancellous chips + DBM putty, roughly a 1.5:1 ratio
- Mixed with a small amount of whole blood for handling and biologic enhancement
The goal consistency is simple: *think chocolate chip cookie dough* - packable, cohesive, and not soupy.
In cases where an anterior closing wedge osteotomy is performed, I’ll incorporate autologous tibial bone into the mix. In larger defects, this can approach a 1:1 ratio with allograft, autograft, with additional putty and blood to optimize volume and texture.
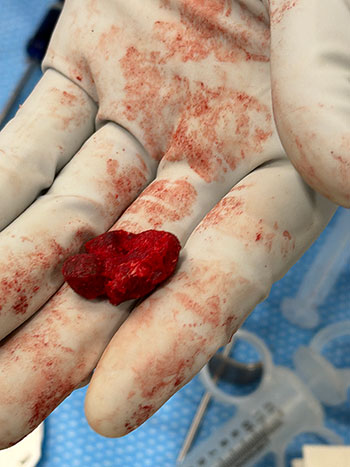
The photo below is Arthrex cortical fibers 7.5 cc mixed with the Allosync Pure 15cc, 7cc whole blood, and 5cc autograft tibia from the closing wedge.
I like the idea of PRP, but am not a patient person, so we use whole blood.
Delivery & Packing
The graft is packed into a cut 3 cc syringe, delivered arthroscopically:
- Femoral tunnel filled first, visualized from the lateral portal
- Digital packing around the femoral corner until firm (usually 3–5 cc)
- Tibial tunnel filled from distal to proximal with finger occlusion at the aperture, gently pressurized as it’s packed
Postoperative Protocol
Even with large tunnel defects, patients are allowed immediate weight bearing. With meticulous preparation and stable graft packing, incorporation has been reliable.
Visualizing Complex Multiligament Knee Reconstruction
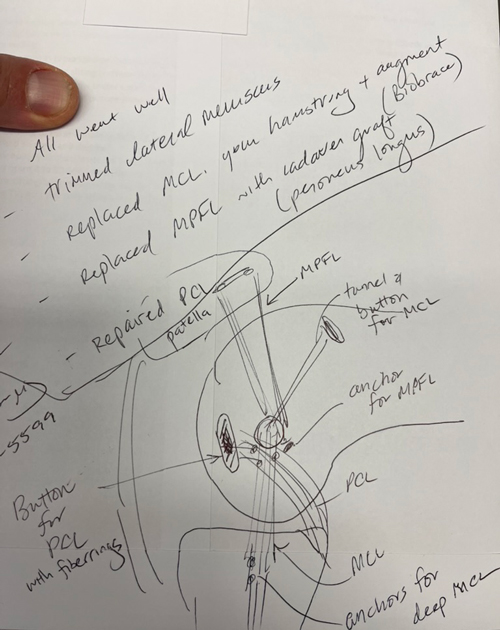
Dr. Chip Routt once taught me that if you can draw it you can understand it and be a better surgeon. While my drawings are not up to the same level as Dr. Routt, I do like to sketch procedures for my patients, especially the more complex ones, like this example of a PCL primary repair with Arthrex FiberRings and repair tightrope, MCL reconstruction with Conmed Biobrace augmentation and an MPFL reconstruction. I generally like to repair more of these severe medial capsular injuries but this one presented closer to 3-4 weeks and we were not able to do as much with the native MCL and medial retinaculum as I would have liked. In severe injuries, particularly a femoral avulsion of the PCL, repair can be very gratifying, and if it fails can be converted to a reconstruction at a second stage. In most all multiligament cases, I stage the ACL reconstruction, do a planned lysis of adhesions and manipulation, reassess all meniscal and cartilage repairs, and check all the prior repairs or reconstructions. In some cases, the patient does not always need to return for that ACL reconstruction, but we talk about a second procedure at the 6 week postoperative visit. I have found that preparing patients for this earlier is helpful and less defeating than an ‘unplanned’ manipulation. The principle I like is: only one surgery that limits weight bearing and motion, and only limit it for 4 weeks. Certainly, no one has the perfect answer for these difficult cases, but I have found this approach to be utilitarian for many (but not all) situations.
| Reconstruction | Preferred Graft | Diameter Target | Finished Length Target | Notes |
|---|---|---|---|---|
| ACL | Quad tendon auto/allograft | 9 mm (varies) | 70 mm | All-soft tissue quad most common |
| PCL AL Bundle | Quad allograft (commonly) | 10 mm | 90 mm | Primary load-bearing bundle |
| PCL PM Bundle | Quad allograft (commonly) | 6–7 mm | 70 mm | Tensioned in extension |
| MCL Reconstruction | Peroneus longus allograft or hamstring autograft | 6–7 mm | ≥280 mm | Usually combined with collagen augmentation |
| MPFL Reconstruction | Peroneus longus allograft | 5–6 mm | 210–220 mm | Length adjusted for patient size |
| ALL Reconstruction | Gracilis/peroneus | 5–6 mm | 120–140 mm | Occasionally combined with ACL |
| LEAT (Modified Lemaire) | IT Band Autograft | 10 mm width | 70 mm length | Left attached to Gerdy’s tubercle |
| Arciero PLC Sling | Single peroneus longus allograft | 6 mm | 280 mm | Allows fibular sling and femoral fixation |
| Isolated LCL Reconstruction | Peroneus or tibialis | 6 mm | 140–160 mm | May be shorter and able to get out of single peroneus |
| Isolated Popliteus Reconstruction | Peroneus or tibialis | 6 mm | 140–160 mm | May be shorter and able to get out of single peroneus |
Easy Operating-Room Memory Aid
(mm)
Thresholds and Targets in Rotational Osteotomy
Femoral Anteversion Correction Planning Using the Murphy Method (CT-Based)
Normal Values
| Parameter | Normal Range |
|---|---|
| Femoral Anteversion (Murphy Method) | Approximately 5–15° |
| External Tibial Torsion | Approximately 25–32° |
| Foot Progression Angle | Approximately 5–15° external |
Surgical Thresholds
Consider rotational correction in symptomatic patients with any of the following:
| Surgical Indication |
|---|
| Femoral anteversion >25° |
| External tibial torsion >30° |
| Recurrent patellar instability |
| Persistent anterior knee pain |
| Failed prior patellofemoral stabilization |
| Significant gait abnormalities |
Correction Targets
Femoral Anteversion >25–30° with Tibial Torsion <30°
- Category
- Details
- Typical Pattern
- Isolated excessive femoral anteversion with minimal compensatory tibial deformity
- Treatment
- Isolated femoral derotation osteotomy
- Target
- Postoperative anteversion approximately 10–15°
- Rationale
- Reliable normalization of patellofemoral mechanics while preserving a physiologic foot progression angle
Femoral Anteversion >25–30° with Tibial Torsion 30–40°
- Category
- Details
- Typical Pattern
- Moderate compensatory external tibial torsion; foot progression often appears relatively normal despite significant femoral deformity
- Treatment
- Femoral derotation alone is often sufficient for patellar instability
- Target
- Generally 10–20° postoperative anteversion
- Key Consideration
- Avoid aggressive correction into low single-digit anteversion values
- Clinical Pearl
- External tibial torsion is frequently adaptive. Complete normalization of femoral anteversion may unmask the tibial deformity and increase postoperative out-toeing.
Femoral Anteversion >25–30° with Tibial Torsion >40–45°
- Category
- Details
- Typical Pattern
- Classic torsional malalignment syndrome ("miserable malalignment"), significant compensatory external tibial torsion, and abnormal foot progression angle
- Treatment
- Consider double-level correction: femoral derotation osteotomy plus tibial derotation osteotomy
- Goals
- Restore physiologic torsional balance; normalize foot progression angle; improve gait mechanics; improve patellofemoral tracking
- Evidence-Based Consideration
- Combined correction most effectively restores gait kinematics and foot progression angle. Single-level femoral correction may adequately address patellar instability but often leaves residual out-toeing.
Summary of This Approach
| Tibial Torsion | Recommended Correction Strategy |
|---|---|
| <30° | Correct femur to approximately 10–15° anteversion |
| 30–40° | Correct femur, but avoid overcorrection; typically leave 10–20° residual anteversion depending on foot progression angle |
| >40–45° | Consider double-level osteotomy (femoral and tibial derotation) |
Biplanar versus Uniplanar Osteotomy of the Distal Femur
Part 1: Femoral derotation
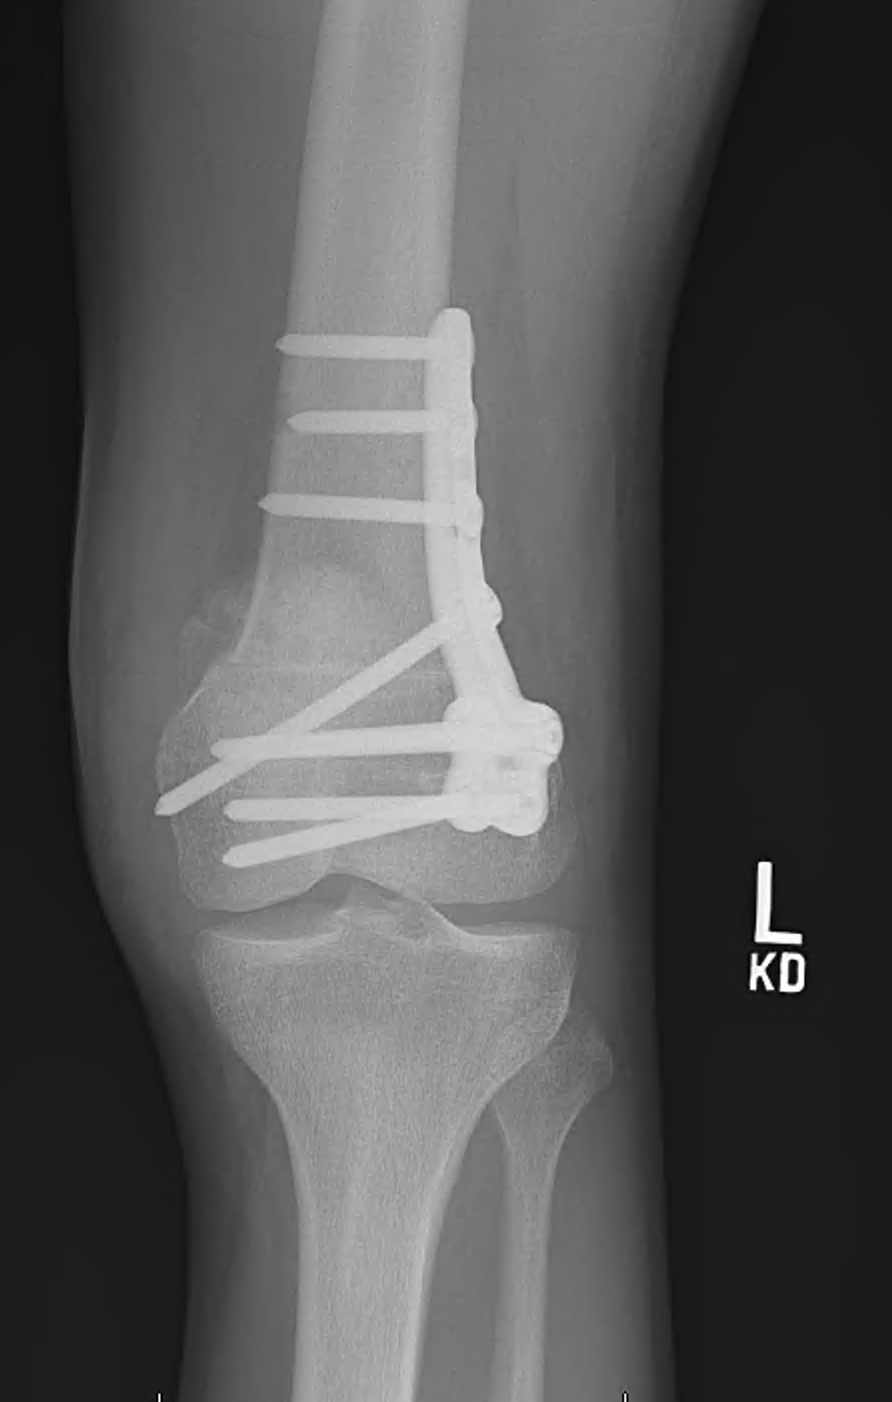
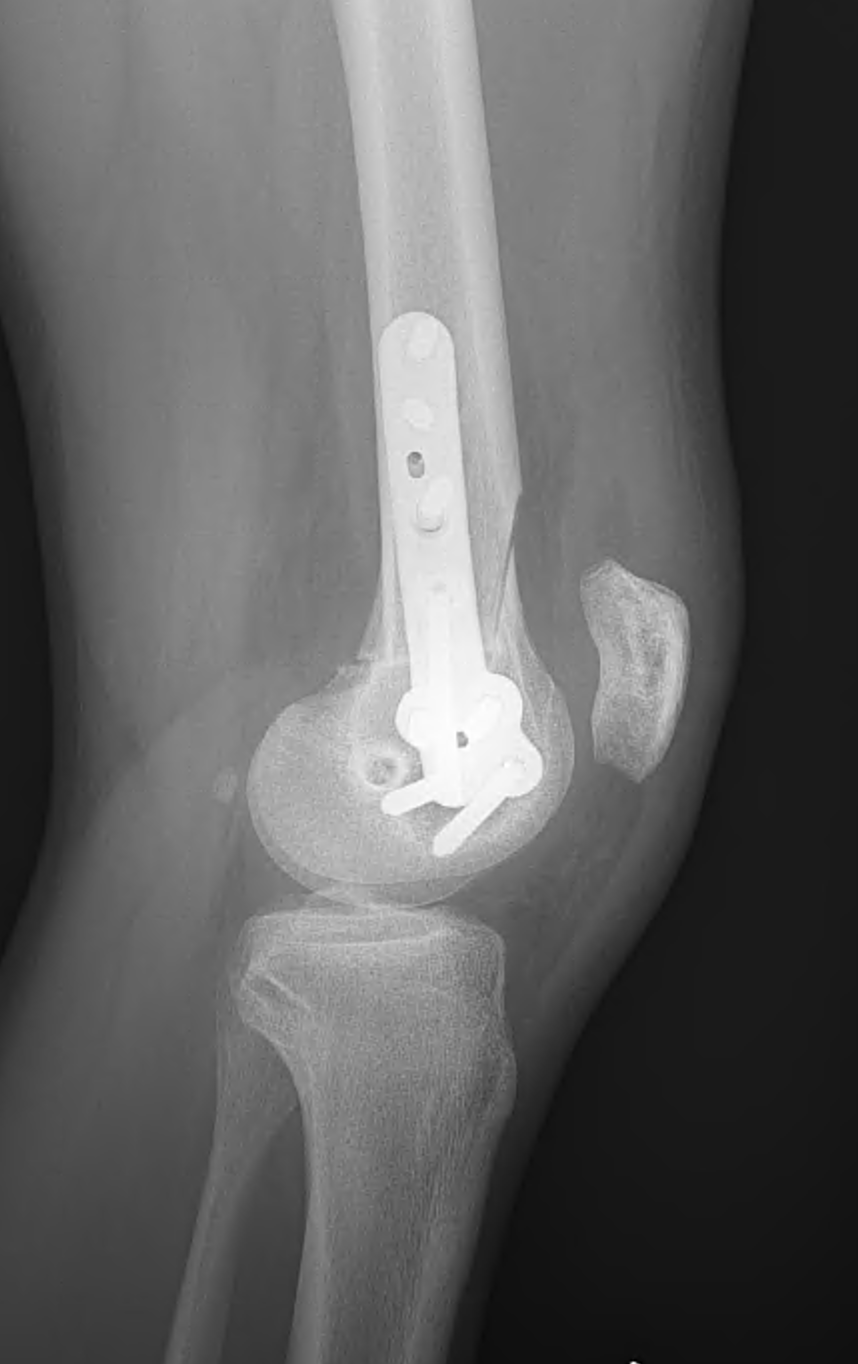
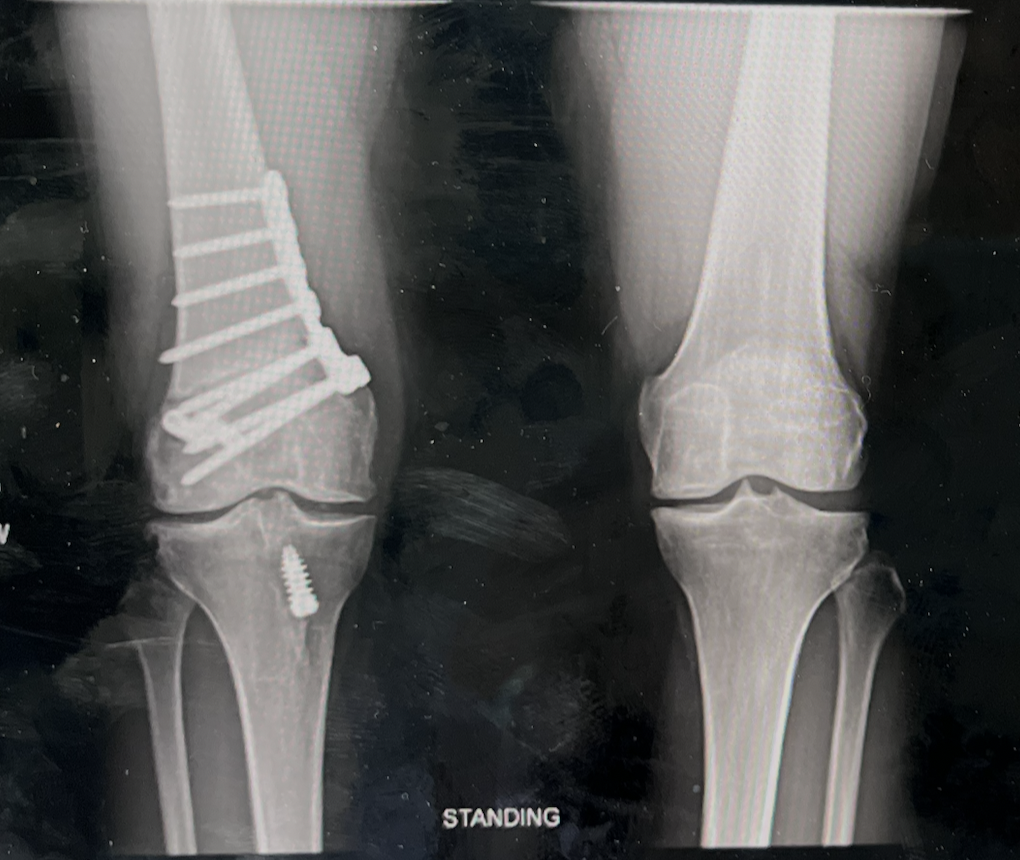
When I was performing distal femoral derotational osteotomies entirely with manual instrumentation, I routinely used a uniplanar osteotomy.
The reason was practical. Planning and accurately executing a biplanar resection for a specific rotational correction is difficult without computer assistance.
Instead, I placed reference pins proximal and distal to the osteotomy, made a uniplanar cut, and used a digital inclinometer to measure the correction as I rotated the distal segment. We described that technique in our Arthroscopy Techniques paper, Distal Femoral Derotational Osteotomy for Excessive Femoral Anteversion.
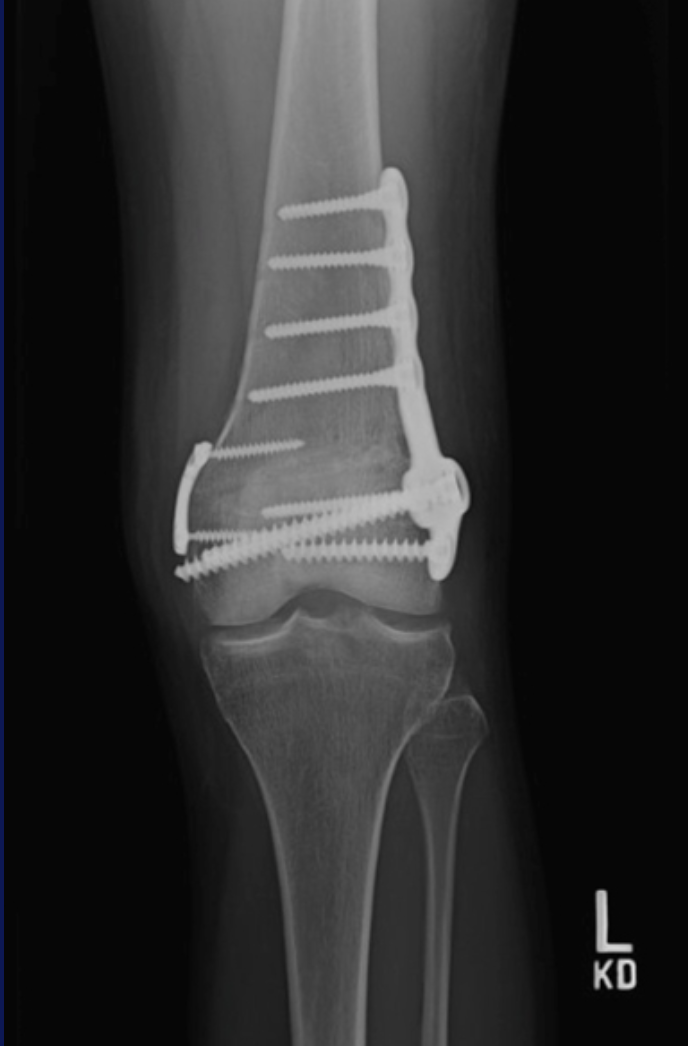
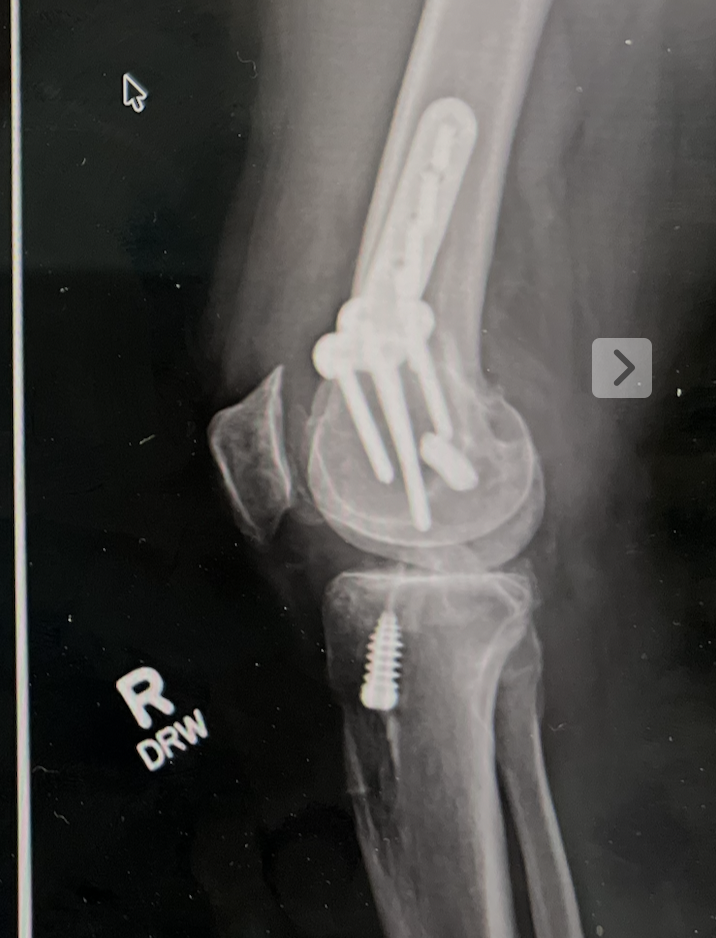
With CT-based planning and patient-specific instrumentation (PSI), my approach has changed. I now make these osteotomies biplanar.
For me, there are several advantages.
First, the biplanar geometry gives me another independent check on the correction. The planned wedge is built into the guide: when the wedge closes, I have another confirmation that I have achieved the planned rotation.
Second, there is more osseous surface area for healing.
Third, the biplanar geometry provides additional rotational control. The biomechanical literature on uniplanar versus biplanar DFO is somewhat nuanced, but there is evidence for improved control of external rotation in certain conditions, particularly when the cortical hinge is compromised.
There is a tradeoff: the biplanar PSI guide is larger. That means the exposure and dissection have to be somewhat larger to accommodate it.
A big thank-you to @George F. Rick Hatch III, MD for his work developing and refining the biplanar guides and helping work through some of the adjustments to the system. These are exactly the kinds of iterative improvements that make new technology more useful in the operating room.
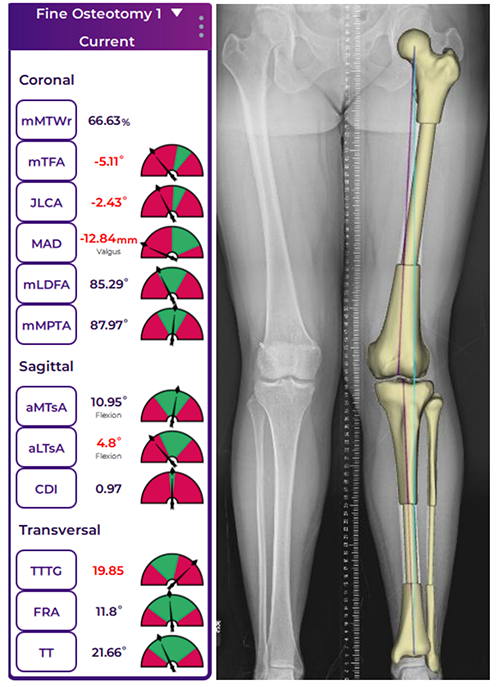
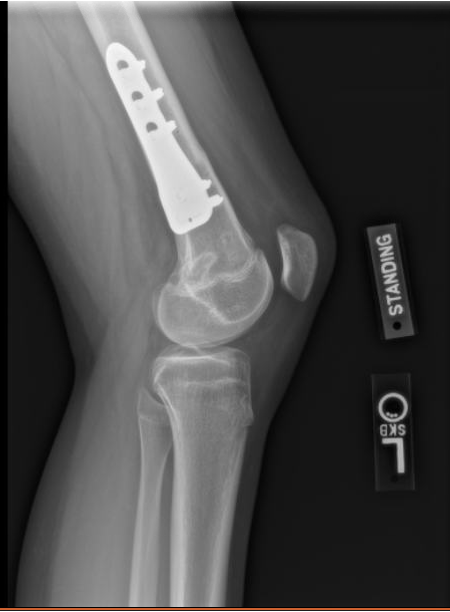
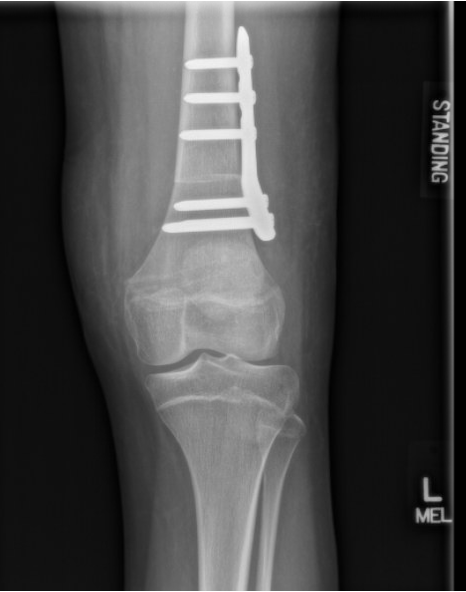
The images with this post show examples of both approaches: the manual uniplanar technique and the newer PSI-guided biplanar technique.
Interestingly, when we move from rotational correction to coronal-plane DFO, my evolution has gone almost exactly the other direction.
Arthrofibrosis
Knee Arthrofibrosis: Prevention, Recognition, and Treatment
Knee arthrofibrosis remains one of the most frustrating complications in orthopedics-not only for patients, but for surgeons as well. Whether following trauma, ligament reconstruction, cartilage restoration, osteotomy, fracture fixation, or total knee arthroplasty, stiffness can dramatically impact outcomes even when the underlying surgery is technically successful.
The most important treatment is prevention.
Early motion remains critical. Equally important is addressing pain, hypersensitivity, inhibition, and kinesiophobia. Patients who become afraid to move, or who develop significant quadriceps inhibition, can quickly enter a cycle of swelling, weakness, guarding, and progressive loss of motion.
When Does Arthrofibrosis Occur?
Arthrofibrosis can develop after:
- ACL reconstruction
- ACL primary repair and tibial spine avulsion fixation
- Multiligament knee reconstruction
- Tibial plateau fractures, particularly medial-sided injuries
- MCL injuries
- Distal femur fractures treated with plates or retrograde nails
- Tibial tubercle osteotomies
- Total knee arthroplasty
- Virtually any surgery or injury around the knee
The Importance of Recognizing Patella Baja
One of the most commonly missed findings in a stiff knee is patella baja.
Whenever I evaluate a stiff knee, I routinely obtain lateral radiographs of both knees for comparison. Failure to recognize patella baja can lead to repeated procedures that never fully address the underlying mechanical problem.
Timing Matters
If a patient is plateauing despite appropriate rehabilitation and I do not identify a clear mechanical or anatomic block, I will often consider an early manipulation under anesthesia (MUA) around 10–12 weeks.
Beyond this point, if significant stiffness persists, I generally favor arthroscopic lysis of adhesions rather than forceful manipulation alone, which may increase the risk of iatrogenic fracture or other complications.
Arthroscopic Treatment Principles
During arthroscopic treatment, I focus on restoring the normal anatomy of the knee:
- Thorough debridement of the anterior interval
- Release of scar tissue within the medial and lateral gutters
- Complete restoration of the suprapatellar pouch
- Mobilization of quadriceps adhesions, occasionally utilizing a Cobb elevator when necessary
When extension remains limited from extra-articular causes, posterior capsular release can be extremely effective in carefully selected patients.
For severe flexion deficits, attention to the suprapatellar pouch and quadriceps adhesions is often just as important as what is occurring inside the joint itself.
Managing Patella Baja
When significant patella baja is present, particularly in advanced cases, I will consider patellar tendon lengthening procedures to restore extensor mechanism mechanics and improve motion.
Emerging Anti-Fibrotic Strategies
We are also beginning to explore anti-fibrotic medication protocols in select high-risk or recurrent cases. While not yet routine, our current approach may include:
- Indomethacin 75 mg daily for 30 days
- Intranasal calcitonin 200 IU daily for 30 days
- Losartan 100 mg daily for 30 days
- Vitamin C 2 g twice daily for 30 days
If stiffness persists, colchicine may be added at 0.6 mg daily and increased as tolerated.
Mechanical Stretching and Rehabilitation
Mechanical stretching remains an important adjunct, utilizing:
- Dynasplint devices
- Prolonged low-load stretching
- Prone hangs for extension deficits
These techniques are often combined with a structured rehabilitation program focused on restoring motion and function.
A Comprehensive Approach
Arthrofibrosis is rarely caused by a single factor. Successful treatment requires identifying the specific biologic, mechanical, and psychological contributors to stiffness and addressing each one systematically as best we can.
Unfortunately, we are not always able to restore full motion.
Key Takeaway
Arthrofibrosis remains one of the most challenging problems in knee surgery. Prevention through early motion, pain control, swelling management, and restoration of quadriceps function remains the most effective treatment strategy. When stiffness develops, careful evaluation of patellar height, scar tissue formation, joint mechanics, rehabilitation progress, and patient-specific risk factors is essential for achieving the best possible outcome.
Biplanar vs uniplanar distal femoral osteotomy, Part 2.
In the last post, I described how the addition of CT-based planning and patient-specific instrumentation changed my derotational DFOs from predominantly uniplanar to biplanar.
For coronal-plane correction, somewhat ironically, the evolution has gone the other direction.
When I was performing distal femoral osteotomies for valgus correction entirely with manual instrumentation, I almost always used a biplanar osteotomy.
One major reason was rotational control.
It is surprisingly easy to introduce an unintended rotational deformity during a coronal-plane correction. If the transverse cut is slightly oblique—or if the leg simply rolls after completing the osteotomy—you can correct the valgus while inadvertently fixing the distal femur in external rotation.
The anterior bone shingle of a biplanar osteotomy gave me a very useful visual and mechanical reference. If the anterior cut reduced anatomically, I knew I had maintained my rotation.
It also provided a convenient place to put a clamp and increased the available bone contact for healing.
That was particularly helpful because, with manual correction, I tended to perform more lateral opening-wedge DFOs. I liked being able to gradually dial in the correction, and the additional anterior bone contact from the biplanar cut was valuable.
Now that I am using CT-based planning and PSI, I have shifted toward medial closing-wedge DFO for the majority of my coronal-plane corrections.
The software allows me to define the correction much more precisely before I ever enter the operating room. With a closing wedge, I can achieve direct bone-to-bone compression and, in my practice, generally advance weight bearing considerably sooner than I would after a lateral opening-wedge osteotomy.
But moving the osteotomy to the medial distal femur changes the exposure.
The VMO is right there, and adding the extra size required for a biplanar PSI guide can become fairly unwieldy. Since the guide itself controls the osteotomy planes and planned correction, I have found less practical benefit from adding the biplanar cut simply as another rotational reference.
So technology has essentially inverted my practice:
For derotation:
Manual → uniplanar
PSI → biplanar
For coronal correction:
Manual → biplanar
PSI → predominantly uniplanar medial closing wedge
I think this is one of the more interesting consequences of adopting new technology. The value isn't simply that it lets us perform the same operation more accurately. Sometimes it changes which operation—or which version of an operation—makes the most sense.
Multimodal Pain Plan
I sometimes get questions about how I am managing postoperative pain. Like many surgeons we employ a multimodal approach that attempts to cover the entire pain pathway from the tissue to the central nervous system. As a general principle, pain, like our food supply, is better when kept locally. Treatments at the site of the tissue are less likely to have side effects than medication that target the brain because of the localized versus the systemic effects. So working from the knee back to the brain this looks something like this:
Field Local
This starts with peripheral local anesthetic- Even when the patient has a peripheral block I will ask the anesthesiologist what amount of additional local anesthetic is available. I generally use 0.5% bupivacaine in the tissues and 0.25% ropivicaine in the joint itself.
Ice and Compression
Patient applied after surgery, the more stimuli we give the other receptors, the less room there is for transmission of pain signals. Also reduces swelling.
TXA- Transaxemic acid
Given systemically but with a very good safety profile and added here because it reduces bleeding and improves hemostasis in the joint. I’ve observed a lot less burising since adding this a few years ago. 1g IV beginning of the case and end.
Peripheral Nerve Block
Typically adductor canal, never femoral nerve, helps tremendously for the first 12-36 hours. Does have rebound pain when the block wears off so we plan ahead for that.
Suzetrigine
Taken orally, works systemically, but is highly specific for the sodium channel in the peripheral nervous system, which makes it unique among other pain medications. By mechanism of action this is stopping those conduction potentials before they reach the spinal cord and central nervous system.
Non-opioids
Tylenol and Ibuprofen, the foundation of postoperative pain management. Often undervalued and underestimated. Work best when taken consistently for the first few days. Work systemically, but generally well tolerated in most people (always clarify allergies, medication list, and medical history).
Opiods
The last resort, but often still necessary. Luckily opioid use is much lower than when I started my career and many patients are choosing to be opioid free.
Helping Patients Manage Pain After Surgery
Because these medications can be overwhelming we created a chart that helps patients see what they can take when to help in the first few days after surgery.
Download the postoperative pain medication chart to help you understand your medication schedule during the first few days after surgery.
Overstuffing the patellofemoral joint
Patellofemoral joint arthroplasty patients do not do as well as unicompartmental arthroplasty of the tibiofemoral joint. There are a couple reasons for this in my opinion. One is that the patients are often younger and almost by definition have an underlying contributing anatomic risk. As sports surgeons we tend to think of dysplasia and of femoral anteversion and tibial torsion. Arthroplasty surgeons have observed the phenomenon of the “tall narrow femur”. This ties into the concept of and increased sagittal TT-TG. In other words, where the tubercle is relatively posterior or the trochlea is relatively anterior creating a larger posterior force vector. And of Simon Talbot’s idea of malrotation of the extensor mechanism, which is both fascinating and terrifying because it is essentially untreatable at its root.
More practically this becomes a concern when considering patellofemoral arthroplasty for several reasons.
1) inlay versus onlay: Inlay designs are subject to high sheer forces, but onlay designs while more stable may also risk overstuffing. In either case, it’s important to scrape down existing cartilage on the trochlea so that when you start making cuts, you are doing so based on the bone and not the cartilage. Because the cartilage is so thick in these locations (patients don’t tend to have as much wear down the groove because it hurts to bend their knee) this simple thing at the beginning of a case helps the implant be seated deeper, getting better fixation in bone and preventing overstuffing.
2) the need to externally rotate the implant in many cases. Whatever the source of the problem the result is typically lateral maltracking that results in patellofemoral wear. When present I will intentionally rotate the implant to let the patella do the driving. This can often be estimated by evaluating the position of the patella on the preoperatve sunrise views. It’s only in rare cases that realignment and arthroplasty are required together with this concept of a ‘metal trochleoplasty’ that allows for altering the position of the groove
3) the patella cut- often downplayed in a lot of TKAs but critical in this procedure. A ‘beret” cut patella that leaves too much medial patella can drive uneven tracking. That being said many of these patellas are thin and sclerotic, making the fracture risk real.
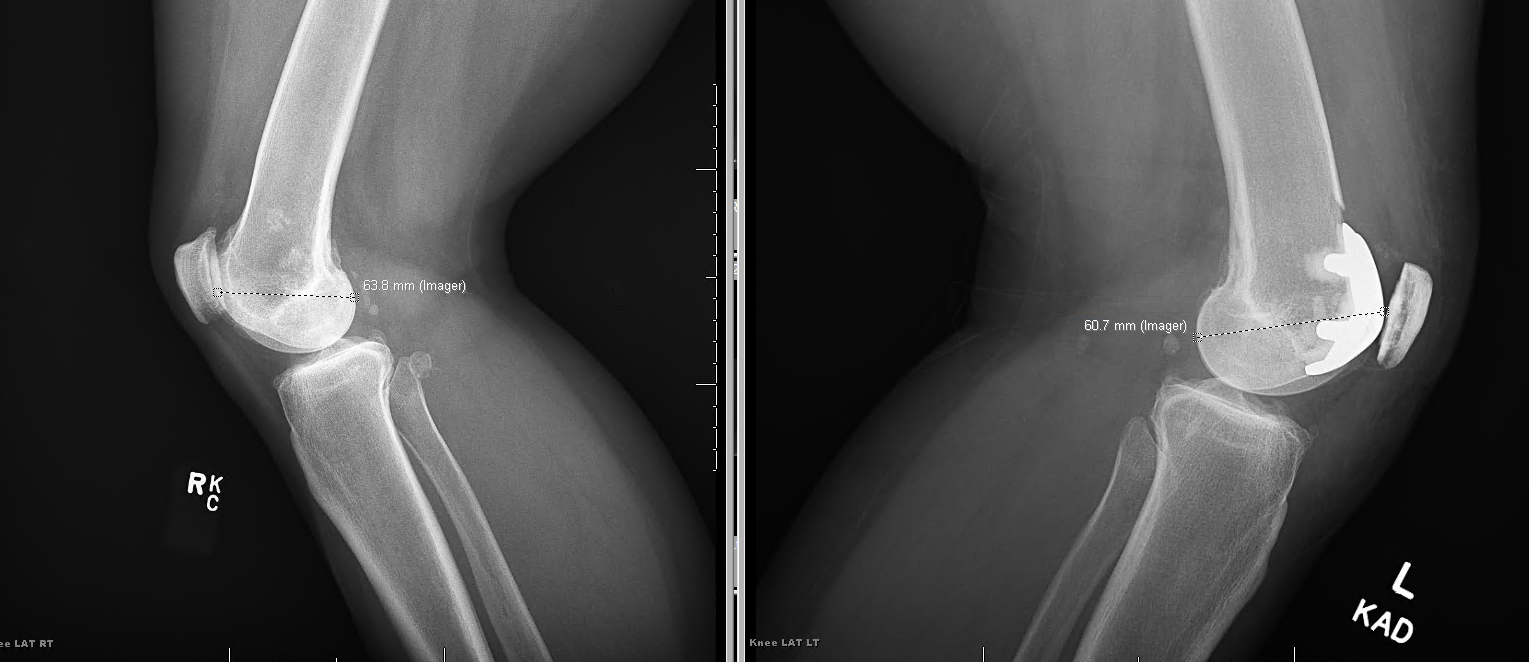
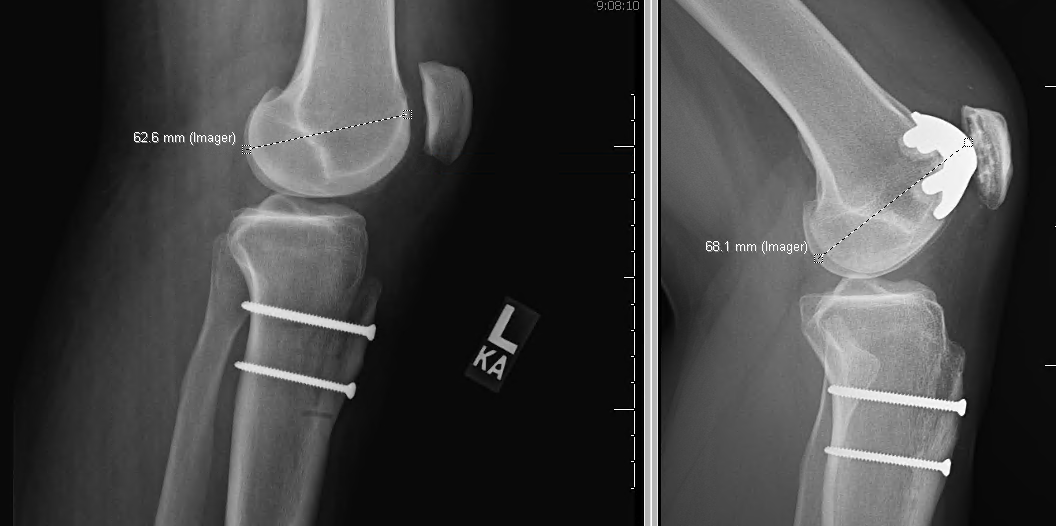
Below is an example of two knees with patellofemoral arthroplasty. It’s very crude but I have measured from the apex of the posterior condyles to the most prominent part of the implant. In one case the distance has been increased by the arthroplasty in the sagittal plane and this patient had pain and stiffness. In the other, the implant has been rotated intentionally, creating a small notch superior laterally, and the distance is decreased from the preoperative state. This patient has better motion and less pain. Stepping back, you don’t need to measure this to see it, but interestingly, the difference in millimeters is not very large.
Offloading the Patella
In some cases, it can be difficult to determine whether a patient is best served by correction of coronal plane valgus with an opening wedge lateral distal femoral osteotomy or correction of tracking of the tibial tubercle for lateral wear of the patella.
In general, the answer has been to perform a tibial tubercle osteotomy. However, it’s important to consider alternatives. Because I do love the features of a closing wedge osteotomy medially, it’s important to understand that this does not change the TT-TG distance and so may not be as effective at offloading the patella, though, it does change coronal plane alignment and alter the Q angle dynamically. It’s also important to understand that an opening wedge osteotomy lowers patella height, potentially increasing overload, but also partially correcting alta if that is present. In summary, it’s important to understand how changes to coronal plane anatomy can affect the TT-TG. It’s important to not get overly obsessed with the number of the TT-TG and to realize this is an artificial construct that indicates only that there are features contributing to underlying maltracking. An elevated TT-TG does not explain what these factors are. Getting good outcomes is more closely tied to ensuring there is no significant anaversion or tibial torsion and considering coronal plane alignment. At this point, there are no comparative studies between tibial tubercle osteotomy and coronal plane alignment to determine which provides better offloading of the patella in a head-to-head fashion that I’m aware of.
In summary, and this seems to get confused more often than you would think, the two operations do different jobs. TTO cannot correct coronal plane (mechanical axis) alignment. It moves the patellar tendon insertion and changes the patellofemoral force vector and contact pressures, not limb alignment. [1-2] LOWDFO corrects femur-based genu valgum where the deformity actually is. [3] So if the question is how to fix coronal alignment, TTO is not really the alternative. The decision depends on where the deformity is: an extensor mechanism problem (raised TT-TG, normal alignment) points to TTO, while femoral valgus points to DFO.
What each operation does
Anteromedializing TTO (AMZ): reduces lateral facet pressure and shifts patellofemoral contact proximally and medially. This is best supported for distal and lateral patellar chondral lesions with a lateralized tubercle (TT-TG >20 mm). It loads proximal and medial lesions more, and outcomes there are poor unless the cartilage is also treated. Results with chondral disease depend on lesion size and location. Worse outcomes have been linked to age >45 and increased femoral anteversion, and femoral anteversion also worsened results after AMZ plus MPFL reconstruction. [1-2][4-5]
LOWDFO: corrects the mechanical axis and lateral distal femoral angle and lowers the Q-angle. The evidence is mostly small series in patellar instability with valgus. These show better PROMs, fewer recurrences, less pain, and on second-look arthroscopy, improvement of lateral and medial patellar facet chondral lesions. Osteotomy is generally considered once valgus reaches ≥5–6°, though I have done them for less in select cases.
DFO also changes the tubercle position
In a 2026 3D CT simulation, LOWDFO changed TT-TG almost 1:1 with the correction angle. Medial closing wedge HTO changed it by only about 1:4. A DFO may therefore lower the lateral vector enough that a separate medializing TTO is unnecessary. This is modeling data, not clinical outcomes. [3]
Opening wedge DFO lowers patellar height (Caton-Deschamps index). Closing wedge DFO keeps it the same. Check patellar height before choosing between them.
Practical approach
Valgus with a femoral source plus lateral patellofemoral overload: DFO addresses the root cause. Add TTO only if a separate tubercle problem remains (TT-TG still high after the planned correction, patella alta, or a distal lateral lesion that needs offloading). Combined DFO plus distalizing TTO has shown improved PROMs in small series. Important to realize that the ability to change TT-TG with this is pretty modest, so may be better for more valgus and a borderline TT-TG. [5]
Neutral alignment with a lateralized tubercle and distal lateral wear: AMZ TTO is the established choice. [1-2]
Lateral tibiofemoral wear along with valgus favors DFO, which also unloads the lateral compartment and also can change patellar height a bit. – Finally, always remember that anteversion is king. It has a much more profound effect than either of these on patellofemoral mechanics and maltracking.