

Going “Knee Deep”
The information provided below is intended as an educational resource intended for surgeons and trainees (medical students, postgraduate residents and fellows starting practice). The information included are my templates for patient expectations, handouts useful for counseling patients in the clinic, forms for completing letters and office paperwork, surgical operative note templates, and similar items. These are free to use for reference, but they should be edited as needed to suit your practice settings and should always be applied with clinical judgement to the treatment of individual patients. They are intended as guidelines and resources and do not constitute medical advice. Unintentional errors, intentional misuse, or unintentional misinterpretation or failure to update this information is the responsibility of the learner/user. Please reach out to me with specific questions.
I myself am always learning and am far from perfect. As seen above in the photograph taken 10 years into clinical practice, I am always seeking to learn and better understand my own techniques and principles. Any adopted modified or evolving techniques will be updated here occasionally, but should not be taken at face value as the exact technique which I am currently using or use in any particular case as I modify each note and resource to suit specific circumstances, the same as I would in clinical care. Please use your judgement but I hope the following information is helpful.
Operative Note Templates
- ACL Auto Template
- ACL Quad Auto Template
- Ex Fix Knee Template
- ACL Repair Template
- ACL Allo Template
- Hardware Removal Template
- Knee MPFL and TTO Template
- OATS allograft Knee Scope Template
- Knee Scope Template
- OATS Knee Scope Template
- ORIF Tibial Plateau Fx Template
- Op Note - Generic
- PCL Allo Template
- Quad Tendon Repair Template
- Tibial Plateau ORIF Template
Surgery Case Preference Cards
- ACL Hamstring Autograft
- Arthroscopy-Distal Femoral Osteotomy with OATS
- ACL Recon ALLOGRAFT
- Arthroscopy-Biocartilage
- ACL Repair vs Recon ALLOGRAFT
- Arthroscopy-Oats
- Meniscus Repair
- MPFL Recon with Allograft
- Meniscus Root Repair
- Arthroscopy
- PCL All Inside- Allograft
- PLC Posterolateral Corner Reconstruction PLC
- PCL
- ACL Recon QUAD AUTOGRAFT
- ACL Repair vs Recon QUAD AUTOGRAFT
- Knee-MCL,LCL Repair
Knee Deep Blog
Visualizing Complex Multiligament Knee Reconstruction
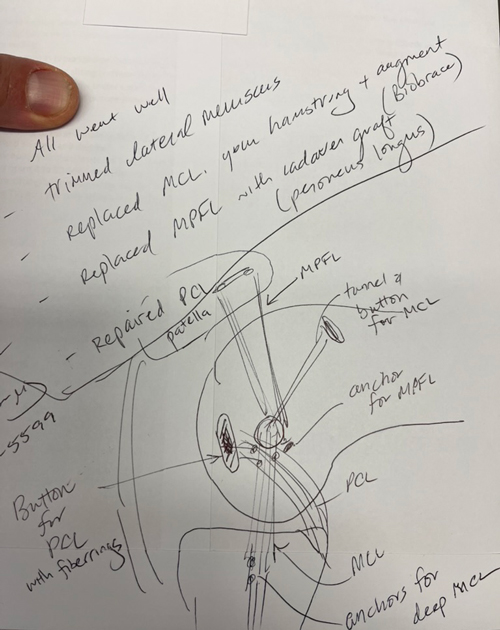
Dr. Chip Routt once taught me that if you can draw it you can understand it and be a better surgeon. While my drawings are not up to the same level as Dr. Routt, I do like to sketch procedures for my patients, especially the more complex ones, like this example of a PCL primary repair with Arthrex FiberRings and repair tightrope, MCL reconstruction with Conmed Biobrace augmentation and an MPFL reconstruction. I generally like to repair more of these severe medial capsular injuries but this one presented closer to 3-4 weeks and we were not able to do as much with the native MCL and medial retinaculum as I would have liked. In severe injuries, particularly a femoral avulsion of the PCL, repair can be very gratifying, and if it fails can be converted to a reconstruction at a second stage. In most all multiligament cases, I stage the ACL reconstruction, do a planned lysis of adhesions and manipulation, reassess all meniscal and cartilage repairs, and check all the prior repairs or reconstructions. In some cases, the patient does not always need to return for that ACL reconstruction, but we talk about a second procedure at the 6 week postoperative visit. I have found that preparing patients for this earlier is helpful and less defeating than an ‘unplanned’ manipulation. The principle I like is: only one surgery that limits weight bearing and motion, and only limit it for 4 weeks. Certainly, no one has the perfect answer for these difficult cases, but I have found this approach to be utilitarian for many (but not all) situations.
Bone Grafting in Two-Stage ACL Revision
Two-stage ACL revision is sometimes unavoidable when prior tunnels are malpositioned, widened, or biologically compromised. I had a recent question:
How do you like to graft ACL tunnels?
In my practice, most revision tunnels aren’t neat cylinders—they’re irregular caverns. This is probably because I tend to see more soft-tissue grafts for revisions rather than BTB. And to be very honest, because I have to revise my own, too, and those tend to be all soft tissue. Because of this geometry, I’ve gravitated away from dowels and toward a chips + putty construct that can conform to the true shape of the defect.
Tunnel Preparation
I use a FlipCutter 3 on the femoral side, progressively enlarging and scraping the tunnel walls until I’m down to clean, bleeding bone. The process naturally creates a conical cavity rather than a uniform cylinder, which reinforces the need for a moldable graft. I tell our fellows you can run the flipcutter and use it like a “toothbrush” along the walls of the tunnel.
On the tibial side, I’ll typically ream to a 10 mm diameter at the joint line. Then this creates enough space for a camera and a currette up the tunnel from inferior. I’m careful to preserve the tibial aperture to avoid blowout into the anterior horns or tibial plateau. Visualization up the tunnel with the camera allows thorough debridement until only bone remains but I don’t typically have the trajectory exact and so again the currette will make an irregular shape but is selective about taking a minimum of bone and all of the old graft.
Graft Composition & Technique
My standard construct is:
- Cancellous chips + DBM putty, roughly a 1.5:1 ratio
- Mixed with a small amount of whole blood for handling and biologic enhancement
The goal consistency is simple: *think chocolate chip cookie dough* - packable, cohesive, and not soupy.
In cases where an anterior closing wedge osteotomy is performed, I’ll incorporate autologous tibial bone into the mix. In larger defects, this can approach a 1:1 ratio with allograft, autograft, with additional putty and blood to optimize volume and texture.
The photo below is Arthrex cortical fibers 7.5 cc mixed with the Allosync Pure 15cc, 7cc whole blood, and 5cc autograft tibia from the closing wedge.
I like the idea of PRP, but am not a patient person, so we use whole blood.
Delivery & Packing
The graft is packed into a cut 3 cc syringe, delivered arthroscopically:
- Femoral tunnel filled first, visualized from the lateral portal
- Digital packing around the femoral corner until firm (usually 3–5 cc)
- Tibial tunnel filled from distal to proximal with finger occlusion at the aperture, gently pressurized as it’s packed
Postoperative Protocol
Even with large tunnel defects, patients are allowed immediate weight bearing. With meticulous preparation and stable graft packing, incorporation has been reliable.
Arthrofibrosis
Knee Arthrofibrosis: Prevention, Recognition, and Treatment
Knee arthrofibrosis remains one of the most frustrating complications in orthopedics-not only for patients, but for surgeons as well. Whether following trauma, ligament reconstruction, cartilage restoration, osteotomy, fracture fixation, or total knee arthroplasty, stiffness can dramatically impact outcomes even when the underlying surgery is technically successful.
The most important treatment is prevention.
Early motion remains critical. Equally important is addressing pain, hypersensitivity, inhibition, and kinesiophobia. Patients who become afraid to move, or who develop significant quadriceps inhibition, can quickly enter a cycle of swelling, weakness, guarding, and progressive loss of motion.
When Does Arthrofibrosis Occur?
Arthrofibrosis can develop after:
- ACL reconstruction
- ACL primary repair and tibial spine avulsion fixation
- Multiligament knee reconstruction
- Tibial plateau fractures, particularly medial-sided injuries
- MCL injuries
- Distal femur fractures treated with plates or retrograde nails
- Tibial tubercle osteotomies
- Total knee arthroplasty
- Virtually any surgery or injury around the knee
The Importance of Recognizing Patella Baja
One of the most commonly missed findings in a stiff knee is patella baja.
Whenever I evaluate a stiff knee, I routinely obtain lateral radiographs of both knees for comparison. Failure to recognize patella baja can lead to repeated procedures that never fully address the underlying mechanical problem.
Timing Matters
If a patient is plateauing despite appropriate rehabilitation and I do not identify a clear mechanical or anatomic block, I will often consider an early manipulation under anesthesia (MUA) around 10–12 weeks.
Beyond this point, if significant stiffness persists, I generally favor arthroscopic lysis of adhesions rather than forceful manipulation alone, which may increase the risk of iatrogenic fracture or other complications.
Arthroscopic Treatment Principles
During arthroscopic treatment, I focus on restoring the normal anatomy of the knee:
- Thorough debridement of the anterior interval
- Release of scar tissue within the medial and lateral gutters
- Complete restoration of the suprapatellar pouch
- Mobilization of quadriceps adhesions, occasionally utilizing a Cobb elevator when necessary
When extension remains limited from extra-articular causes, posterior capsular release can be extremely effective in carefully selected patients.
For severe flexion deficits, attention to the suprapatellar pouch and quadriceps adhesions is often just as important as what is occurring inside the joint itself.
Managing Patella Baja
When significant patella baja is present, particularly in advanced cases, I will consider patellar tendon lengthening procedures to restore extensor mechanism mechanics and improve motion.
Emerging Anti-Fibrotic Strategies
We are also beginning to explore anti-fibrotic medication protocols in select high-risk or recurrent cases. While not yet routine, our current approach may include:
- Indomethacin 75 mg daily for 30 days
- Intranasal calcitonin 200 IU daily for 30 days
- Losartan 100 mg daily for 30 days
- Vitamin C 2 g twice daily for 30 days
If stiffness persists, colchicine may be added at 0.6 mg daily and increased as tolerated.
Mechanical Stretching and Rehabilitation
Mechanical stretching remains an important adjunct, utilizing:
- Dynasplint devices
- Prolonged low-load stretching
- Prone hangs for extension deficits
These techniques are often combined with a structured rehabilitation program focused on restoring motion and function.
A Comprehensive Approach
Arthrofibrosis is rarely caused by a single factor. Successful treatment requires identifying the specific biologic, mechanical, and psychological contributors to stiffness and addressing each one systematically as best we can.
Unfortunately, we are not always able to restore full motion.
Key Takeaway
Arthrofibrosis remains one of the most challenging problems in knee surgery. Prevention through early motion, pain control, swelling management, and restoration of quadriceps function remains the most effective treatment strategy. When stiffness develops, careful evaluation of patellar height, scar tissue formation, joint mechanics, rehabilitation progress, and patient-specific risk factors is essential for achieving the best possible outcome.
Thresholds and Targets in Rotational Osteotomy
Femoral Anteversion Correction Planning Using the Murphy Method (CT-Based)
Normal Values
| Parameter | Normal Range |
|---|---|
| Femoral Anteversion (Murphy Method) | Approximately 5–15° |
| External Tibial Torsion | Approximately 25–32° |
| Foot Progression Angle | Approximately 5–15° external |
Surgical Thresholds
Consider rotational correction in symptomatic patients with any of the following:
| Surgical Indication |
|---|
| Femoral anteversion >25° |
| External tibial torsion >30° |
| Recurrent patellar instability |
| Persistent anterior knee pain |
| Failed prior patellofemoral stabilization |
| Significant gait abnormalities |
Correction Targets
Femoral Anteversion >25–30° with Tibial Torsion <30°
- Category
- Details
- Typical Pattern
- Isolated excessive femoral anteversion with minimal compensatory tibial deformity
- Treatment
- Isolated femoral derotation osteotomy
- Target
- Postoperative anteversion approximately 10–15°
- Rationale
- Reliable normalization of patellofemoral mechanics while preserving a physiologic foot progression angle
Femoral Anteversion >25–30° with Tibial Torsion 30–40°
- Category
- Details
- Typical Pattern
- Moderate compensatory external tibial torsion; foot progression often appears relatively normal despite significant femoral deformity
- Treatment
- Femoral derotation alone is often sufficient for patellar instability
- Target
- Generally 10–20° postoperative anteversion
- Key Consideration
- Avoid aggressive correction into low single-digit anteversion values
- Clinical Pearl
- External tibial torsion is frequently adaptive. Complete normalization of femoral anteversion may unmask the tibial deformity and increase postoperative out-toeing.
Femoral Anteversion >25–30° with Tibial Torsion >40–45°
- Category
- Details
- Typical Pattern
- Classic torsional malalignment syndrome ("miserable malalignment"), significant compensatory external tibial torsion, and abnormal foot progression angle
- Treatment
- Consider double-level correction: femoral derotation osteotomy plus tibial derotation osteotomy
- Goals
- Restore physiologic torsional balance; normalize foot progression angle; improve gait mechanics; improve patellofemoral tracking
- Evidence-Based Consideration
- Combined correction most effectively restores gait kinematics and foot progression angle. Single-level femoral correction may adequately address patellar instability but often leaves residual out-toeing.
Summary of This Approach
| Tibial Torsion | Recommended Correction Strategy |
|---|---|
| <30° | Correct femur to approximately 10–15° anteversion |
| 30–40° | Correct femur, but avoid overcorrection; typically leave 10–20° residual anteversion depending on foot progression angle |
| >40–45° | Consider double-level osteotomy (femoral and tibial derotation) |
| Reconstruction | Preferred Graft | Diameter Target | Finished Length Target | Notes |
|---|---|---|---|---|
| ACL | Quad tendon auto/allograft | 9 mm (varies) | 70 mm | All-soft tissue quad most common |
| PCL AL Bundle | Quad allograft (commonly) | 10 mm | 90 mm | Primary load-bearing bundle |
| PCL PM Bundle | Quad allograft (commonly) | 6–7 mm | 70 mm | Tensioned in extension |
| MCL Reconstruction | Peroneus longus allograft or hamstring autograft | 6–7 mm | ≥280 mm | Usually combined with collagen augmentation |
| MPFL Reconstruction | Peroneus longus allograft | 5–6 mm | 210–220 mm | Length adjusted for patient size |
| ALL Reconstruction | Gracilis/peroneus | 5–6 mm | 120–140 mm | Occasionally combined with ACL |
| LEAT (Modified Lemaire) | IT Band Autograft | 10 mm width | 70 mm length | Left attached to Gerdy’s tubercle |
| Arciero PLC Sling | Single peroneus longus allograft | 6 mm | 280 mm | Allows fibular sling and femoral fixation |
| Isolated LCL Reconstruction | Peroneus or tibialis | 6 mm | 140–160 mm | May be shorter and able to get out of single peroneus |
| Isolated Popliteus Reconstruction | Peroneus or tibialis | 6 mm | 140–160 mm | May be shorter and able to get out of single peroneus |
Easy Operating-Room Memory Aid
(mm)


